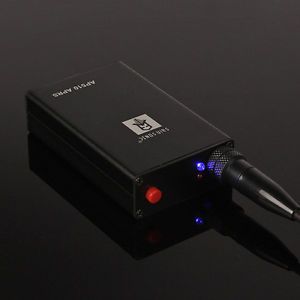
I’ve had great success with this standalone US$100 APRS tracker for HAB missions. The pocket-sized unit consists of a 1W radio that can both transmit and receive APRS packets across the 2m spectrum. It has a slot for a microSD card for recording position data as well as a Bluetooth interface for acting like a packet TNC. Its rechargeable 3300mAh battery lasts a day. When stripped of its metal case, the guts weigh only 100g.
The instructions included with the device are limited at best, so you must often rely upon on-line resources for troubleshooting.
Pressing the red power button for 2 seconds turns it on with a “beep-beep, beeeeeeeeeep”. It will immediately transmit its “Status Text” and then try to acquire a GPS position. Tapping the power button briefly, while operating, will also send a “Status” packet. Pressing power >10 seconds will switch it to panic mode where it will send the contents of the “Emergency Text” field and a different APRS icon. You press the power button for ~4 seconds to turn it off with a “beeeeeeep, beepbeepbeepbeepbeep”.
Flight usage:
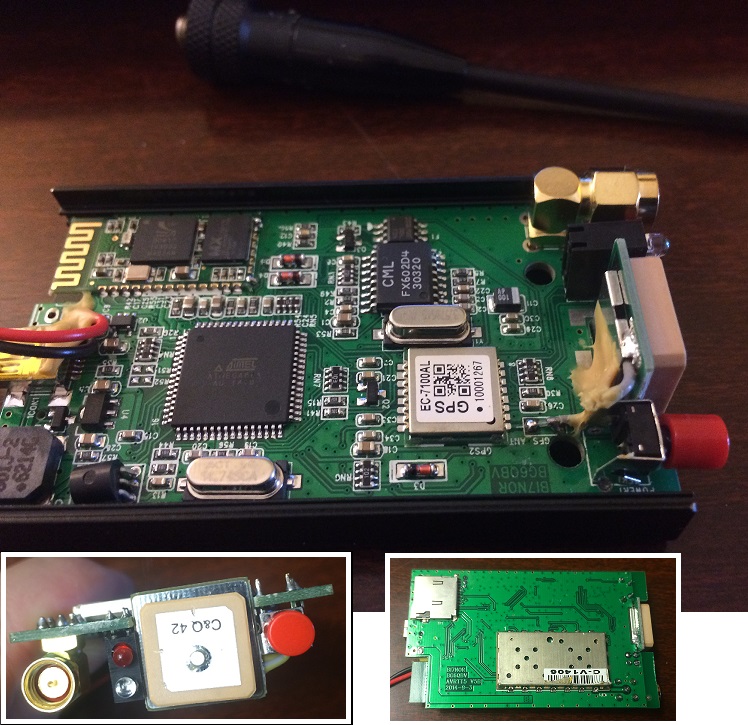
I remove the heavy metal case to save on weight. Be careful doing this so as to not damage the delicate LiPo. On some low mass flights, I have swapped out the sizable LiPo battery with an even larger one that can handle the tracker and an attached camera. If I am concerned about battery life, I will leave the USB charging cable plugged-in to a power source until just prior to launch.
When constructing your payload, ensure that the GPS antenna (square brown patch) can clearly see the sky. The black HAM antenna should be vertical. You could extend or replace the antennas, but I find it just as easy to simply mount the AP510 upright at the top of the payload.
Care must be taken to keep RF interference away from the unit. Some gear, like cameras and other GPS units, give off a lot of RF that can prevent a GPS lock. Aluminum foil shielding or relocating the gear can help.
12 hours prior to the flight, I double-check the configuration on the unit and plug it in to charge. The red LED will go out when fully charged. About 20 minutes before launch, prior to filling the balloon, I turn the unit on and let it get a good GPS lock. Only after I see a couple of good packets flowing do I start the balloon fill.
Configuration:
You will need to connect the AP510 to a Windows PC to configure it (although rumor is that you can use Chirp on other systems). You can use any mini-USB cable to recharge the device’s 3.7V LiPo, but the included cable is required to communicate with the device (it performs the needed level shifting). Mark this cable so that you can identify it easily. You may find that your Windows environment needs some poking to get the cable’s drivers to install. Once the drivers are installed, cable the AP510 up to your computer and launch the AP510 config.exe program. Towards the bottom left of the program window is a pull-down for selecting the COM port for the USB cable. If you are unsure which COM port to use, check your list of “Ports” on your computer’s Device Manager for “Prolific USB-to-Serial”. With that selected, you then press the “Read Config” button and then immediately turn on the AP510 by pressing the red button for about 2 seconds (the unit play some tones). This will hopefully read from the device and fill in the missing blanks on your config program. If you have issues getting the device to read, then try flashing the latest firmware to it. Once you have made your changes, pressing “Write Config” should update the tracker.
For HAB flights I recommend the following settings:
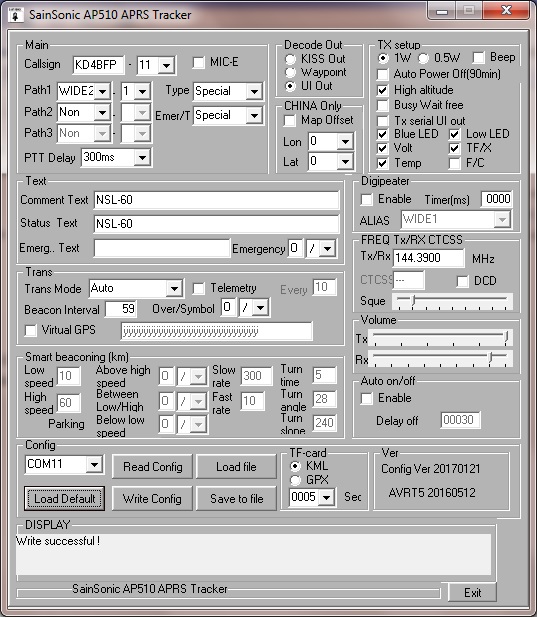
Ensure that you have “High altitude” checked and “Auto Power Off” unchecked !
Typically on HAB flights, the callsign’s SSID is set to “-11”. This isn’t a requirement but some tracking apps keep an eye out specifically for the “-11”. When I fly multiple payloads, I usually set them up as -9,-10,-11 etc. and then use something like -4 for my chase car.
Be a respectful HAM operator and don’t tie up the network with packets more frequent than 60 seconds. I suggest turning-off “Smart Beaconing” on APRS trackers. Smart Beaconing is a feature that will detect the change in direction of your travel and automatically transmit a packet. It’s useful when tracking your car’s turns instead of relying upon sending an update every few minutes. But, as I accidentally learned on my first APRS flight, the simple act of swinging a payload on the end of a long string might set off this detection (I ended up crushing the east coast network as my transmitter lit-up every repeater and iGate for hundreds of miles — every few seconds).
The config shown above will transmit a position every minute [59 sec +1 sec overhead]. The packet also contains the on-board temperature and battery voltage. If a small microSD card is installed, the tracker will record a data point to a KML file on the card every 5 seconds. If you need to be able to read the raw APRS packet, then uncheck the MIC-E compression option. Otherwise MIC-E compression will yield a smaller packet size, which might be easier to receive completely.
A raw packet sent with MIC-E disabled may look like this:
2017-10-07 11:10:55 EDT: KD4BFP-11>APAVT5,WIDE2-1, qAR,AC4JG-:=3534.55N/07820.58WO164/007/A=141050NSL-60 K 3.85V 27.3C TF
2017-10-07 11:10:55 EDT: The date/timestamp is from the receiving station, not the on-board time.
KD4BFP-11>APAVT5, Your callsign is sending a message to the generic destination for this device.
WIDE2-1,qAR,AC4JG-1 Repeater information
:=3534.55N/07820.58WO164/007/A=141050 Your lat/long/alt (35° 34.55’ N).
NSL-60 The Comment field
K High altitude mode is enabled.
3.85V LiPo battery voltage. This can be 4.2V to 3.4V
27.3C Temperature from sensor on the board. This 18B20 sensor (TO-92 package) can be unsoldered and extended if desired.
TF TF=Good microSD card installed. X = card missing.
A note on PATHs.
Paths in APRS tell local and regional repeaters how to handle the received packet. This can be useful when you are simply driving around the countryside and only have enough power to be heard nearby. But when you are in the stratosphere your signal may be heard by dozens of repeaters over hundreds of miles; and this can cause an undesired packet storm. For HAB, please keep your PATH2 and PATH3 set to “NON”. PATH1 should be set to either “NON” or “WIDE2-1”. The “NON” setting will prevent any repeaters from re-sending the packet. “WIDE2-1” will allow only the big regional repeaters to resend. Even with these precautions, you may still see sites like aprs.fi report errors such as “[Duplicate position packet]”, “[Location changes too fast (adaptive limit)]”, or “[Rate limited (< 5 sec)]”.
Also be aware that your packet may be received by multiple iGates, each with their own different Internet connections. If an iGate with a slow Internet announces your packet with delay, you may see your tracking app suddenly report that your HAB is traveling backwards to a previous location.
Recorded data:
The AP510 can be configured to record position data to a microSD card. This data is rather small so you can get away with using any old/cheap microSD. I’ve used 32MB and 2GB cards that were salvaged from ancient cell phones. The file saved to the card will have a timestamp for a name, so you do not have to worry about files being overwritten. In most cases, the .KML file can be readily opened in Google Earth to display the flight. Sometimes though, I find that I must make a minor tweak or two to the file to fix the odd data bug. This can be identified by opening the file in a text editor. Sometimes a data point will not be recorded completely. You can either discard that data point, or fix it by interpolation. I imagine that this happens when the unit is trying to transmit at the same time that it is writing to the microSD. Occasionally I discover a single digit error of some sort with the recorded temperature. These can happen sometimes on microcontrollers that have A/D circuitry with multiple functions. These errors can be readily spotted and fixed.
When set to KML mode, the recorded information looks like this:
–078.3421,35.5750,43118.4 <!-- sats:10 bat: 3.84V temp: 27,5C UTC 15:11:15 -->
Bluetooth connection:
I have tried using the AP510s mini-USB serial port for live communication to act as a Terminal Node Controller, but I get a lot of data errors. I suspect that the RF coupling from the transmitter is to blame. But the AP510 can be paired up with a computer using Bluetooth and this works well. Recently, I have been keeping a second AP510 in my chase car to act as a local APRS receiver. I use an old Android tablet running APRSdroid to speak with it. Sometimes I add a better external antenna to the AP510. Other times I simply hold it out the car window.
I have also conducted flights where I’ve flown an Arduino with a Bluetooth module to communicate with the payload’s AP510. With this rig, the Arduino can listen in on the flight’s progress and also communicate with me on the ground via APRS messages. I have used this to record overheard APRS traffic while in the stratosphere (copy traffic hundreds of miles away). I have also instructed the Arduino to turn certain equipment on/off remotely. There are a limited number of commands that the AP510 can process via AT commands (change callsign, frequency), so it is possible to have an Arduino change these values.
Flashing firmware:
Connect the AP510 to your PC using the special USB cable that came with it. Ensure that the AP510 is off – the RED charging LED may be on.
Run AVRTTupdata.exe and make sure you have the desired .hex firmware handy.
From within the AVRTTupdata.exe program, select Option/Comport and pick the correct com port of your AP510. Check your computer’s Device Manager for “Prolific USB-to-Serial” if you are not sure.
Then select File/Load and point it to your firmware .hex file.
Now to perform the upgrade, select Operate/Download. Once you select this IMMEDIATELY start holding down the red power button on the AP510 — KEEP HOLDING IT. You’ll have to hold it down for about 30 seconds while the firmware loads.
Once the program states that it loaded correctly, you may let up on the red button. It may beep for a while, but eventually you should be able to hold the red button down again to turn it off.
Other links:
https://groups.yahoo.com/neo/groups/AP510/info
http://dk7xe.blogspot.com/2014/09/ap510-avrt5-aprs-tracker.html
https://oh2fxd.wordpress.com/2014/12/19/into-to-the-wild-with-sainsonic-ap510-aprs-tracker/
-Paul Lowell, KD4BFP