The parachute needed for a HAB flight will be similar in most respects to those used in model rockets. Here are a couple of sample videos:
The difference from rocketry is that, for a typical HAB stack…
BALLOON
|
|
PARACHUTE
|
|
PAYLOAD
…we will need to be able to attach the balloon to the top of the parachute. Simply tying a string to the peak on one of the above parachutes may end in failure if the parachute itself comes apart. For that reason, I would suggest that you run a string up through the center of the parachute and out the top.
The biggest concern with this arrangement is that often at burst, pieces of the balloon will foul/tangle the parachute.
Some of my earlier flights tried Balloon–Payload–Parachute, but the lower chute either stays open and acts as a sea anchor (slows ascent) or must be tied up with a piece of tape. In both cases I found that the drag from below the payload tended to toss the payload around more. I thought it would steady the onboard videos, but it actually made things worse. And connecting the chute/payload directly to the balloon didn’t help either.
I now tend to use long lines (>6m) between each part of the train. 10-15m string length is normal to me now.
Determine the parachute shape and size.
You can make all sorts of different shapes of parachutes. For simplicity, I’d suggest that you go with a “flat” chute (made of a single piece of flat fabric) that is cut into either a circle or hexagon (hexagon needs less lines than octagon). Perhaps watch the videos above and flip a coin. Then go to this online tool:
http://descentratecalculator.onlinetesting.net/
Enter rocket mass:            Payload mass.  For now shoot for 1000g
Enter parachute diameter:       Start with 36” (1 yard material)
Choose the shape of your parachute:          Pick Round or Hexagonal
How did you measure the size of your chute?:       Side-side for Hex
Then CALCULATE.  You will get a Descent rate around 5.x meters/sec.
I typically shoot for a descent rate around 5-6m/s. Adjust diameter if needed, but keep it under 8m/s. Remember that it will fall much faster than that above 5km — this is only the landing speed. Bottom line: For an 800-1300g payload, a 36” chute (round or hexagonal) will work fine.
Materials
You want lightweight material that can hold up to stress and cold temperature. Go for a bright color. I usually get some super lightweight kite rip-stop nylon fabric on the Internet or my favorite local store https://ripstopbytheroll.com/. Get enough for a couple of chutes and mistakes.
Build
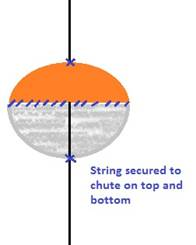
If going with something like the first video, you may want to also sew the tulle to the chute material, at least in several places. Hot glue does pretty well, but it gets brittle at -40C. You will want to run a string up through the middle of the chute and out a small hole in the peak. This will be used to bear the weight of the payload while under the balloon. When securing the string to the top and bottom of the chute, ensure that you have enough string inside of the chute for it to open properly. The hope of this type of shroud-line-less chute is that it would be less likely to tangle with balloon pieces AND perhaps tree branches and allow the payload to reach the forest floor. I’ve never had scrap latex foul a “tulle chute”. But over many forest landings I have yet to have this work out perfectly against trees, but this type of chute is easier to pull down once we get a line over it.
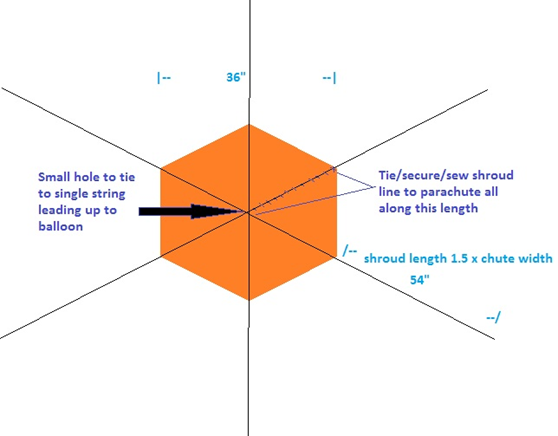
If going with the second video and hexagonal chute, you could either run a seventh line up through the center, or just simply use three long shroud lines that cross in the center to create a tie off point. These shroud lines would then need to be tied to the points of the chute and somehow tacked along its length.
Test
Put two water bottles (2x 500ml) in a bag tied to the bottom of the chute and drop from a good height. 5m/s may seem fast, but you want that when you have 30,000m to travel.
–Paul Lowell