Obtaining flight predictions and how much lifting gas to use.
Due to the many weather service balloons flying daily, we have pretty accurate data to predict an upcoming High Altitude Balloon flight. Most of the work has been bundled into a web-based tool to help you prepare for a flight. As you design your payload, you will need to know what type of balloon you plan to fly and the amount of lift gas you need to purchase. Then as the actual flight day approaches, you will want to know its trajectory. This same tool can be used for both. Here’s how I suggest going about the process:
1) Eventually you will need to gather the following information to generate an accurate prediction:-Launch location (latitude, longitude, altitude)
-Launch time (in GMT)
-Make/Model of your balloon
-Is this a standard bursting balloon, or are you trying to float around the world?
-Weight of your payload (total mass of everything flying that is not your balloon and gas)
-Type of lift gas
-Amount of lift gas OR target ascent rate
But starting out, you may not know all of this, so the web tool has defaults that will get you close.
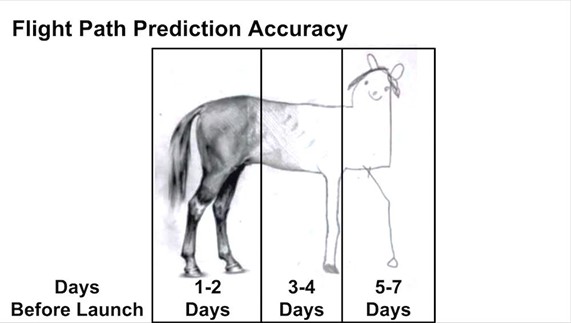
2) Visit the tool at this awesome web site: https://predict.sondehub.org/ Again, it uses existing weather models to help predict your future flight. You may run simulations up to 7 days before a flight but be sure to run one just before launch. Like most weather predictions, they become more accurate the closer to the launch date. Keep this wonderful image in mind:
3) Once at https://predict.sondehub.org/, drag the map to your location. Perhaps center the map on a nearby open space or park. Click on “Set With Map” and then click on this park on the map. This will set your Lat/Long. You will want to type in your “Launch altitude” in meters (you can usually Google this), but feel free to skip this initially. Then click on “Save Location” to store this information under a name of your choosing as a “Custom” site in your browser cache for future use.
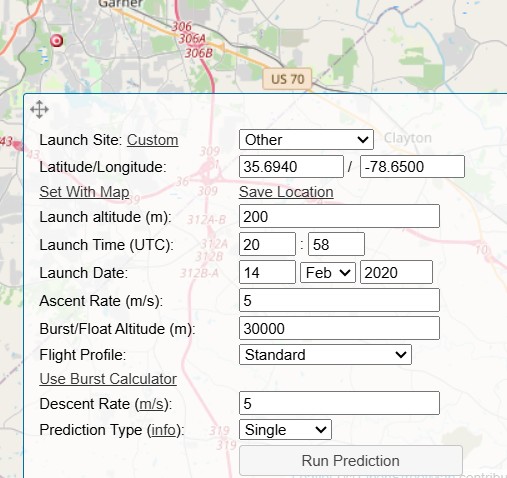
4) Enter in the “Launch Date” and “Launch Time.” If just practicing, you can use the defaults (now); otherwise, you can type in a few days into the future. Be sure to use GMT (UTC) time in 24-hour format.
5) Click the Run Prediction button at the bottom. This will give you a rough flight prediction showing that launch, burst, and landing. At this point, you haven’t entered specifics about your payload, but you can see what a generic flight would look like. Is this what you expected? This may lead to discussions with your team about changing the launch location or time. During some times of the year, a change in launch time as little as 1 hour can dramatically change the flight path.
6) Play with it! Change the date or time and see how it affects things. You can change the “Prediction Type” to run several plots at once with a change in launch time. As you use this tool more, you will gain a feeling about what type of flights are possible.
But before an actual flight, you will need to answer the questions in Step 1. So, let’s look at those in detail.
Click on “Use Burst Calculator.” You should get a pop-up window asking for more information:
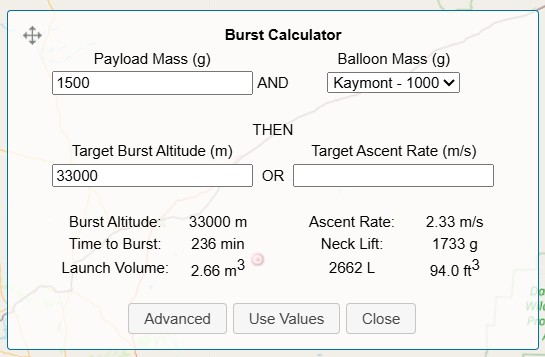
-Enter the calculated mass in grams of everything that you are flying except the balloon and gas. My flights are designed to be around 800-900g. I would try to stay under 1500g for a first flight.
-Then select the Make/Model of balloon you are using. My favorite is https://scientificsales.com/products/600g-weather-balloon-natural-latex-8240 so I select the “Hwoyee – 600” from the drop-down list.
-Delete “33000” out the “Target Burst Altitude” and instead type in “5” for the “Target Ascent Rate”. This is a safe value to begin with (see far below).
-Finally, click on the Advanced button and select your lifting gas. I use industrial Hydrogen (99%) so I just pick “Hydrogen.” Be aware that some Helium sold is actually a Helium/air mixture, so you may not get the lift you expect if you select “Helium”.
-Click Back and Use Values, and then Run Prediction again. This should generate a more accurate plot but usually pretty close to generic values.
Q: Do you need to launch from a specific location and/or a specific time?
It is always preferable if you are free to change your launch location or launch time. Then you can adjust these variables to get you closer to your desired landing area. I shoot for a landing area that is mostly rural fields – I avoid water, swamps, cities, and forests. Absolutely avoid any restricted air spaces! If you must launch from a specific site and time (ex. public launch event), that limits your options on where you travel/land.
Q: What if you are launching from a public event at a certain time and your prediction lands you in an unwanted area?
Try running the simulation with more or less lift gas — Or perhaps a heavier or lighter payload. Try to stay above 2m/s of ascent rate to prevent your balloon from floating out to sea. Also see my blog about parachute design. I suggest Descent Rate no faster than 5m/s for safety. But I suppose you could lengthen your landing plot with a larger chute that slows you down to something like 3m/s.
When performing a public flight, I usually have a discussion with the event coordinators 24 hours before the launch just to go over the flight path. Be up front about what bad weather or bad flight path could mean. It may be far safer to launch from a different location and simulcast/stream the launch — Or launch a dummy payload — Or scrub the launch.
Q: How much lift gas do I need?
Under the “Use Burst Calculator” it lists “Launch Volume.” This is how much lift gas you will need for that prediction. How much gas comes in your tank?
*** Especially take note of the value for “Neck Lift.” This is the amount of upward pull on your balloon when it is filled to the correct amount for this prediction. I make my filling rig to equal this “Neck Lift” weight. Typically, I secure a bag to my filler tube and then add water bottles and such until it measures this exact number of grams. I can then fill the balloon until it is neutrally buoyant with this filler. My favorite Ascent Rate is around 4.5 m/s.
The less lift gas you use =
the lower the ascent rate =
the more room your balloon has to expand =
the higher your flight can go before burst!
If you are shooting for an especially high altitude; use a lighter payload, less gas, and/or a larger balloon.
REMINDER: Run this tool just before your launch to get the most up-to-date plot. COOL-> The Scenario Information window allows you to download a KML of the flight that you can import into Google Earth! If you are using APRS to track your flight, the aprs.fi website also has a “Google Earth KML” live output. If you have internet on the chase, you can have the prediction and live data display on the same Google Earth screen!
-Paul KD4BFP